> ## Documentation Index
> Fetch the complete documentation index at: https://context7.com/docs/llms.txt
> Use this file to discover all available pages before exploring further.
# OpenID Connect (OIDC) SSO
> Let your team sign in with any OIDC-compatible identity provider instead of shared passwords.
Context7 On-Premise supports single sign-on with any provider that implements the OpenID Connect standard: Okta, Keycloak, Auth0, Ping Identity, on-premise LDAP-backed IdPs, and many others. Once you connect your provider, team members are redirected to your identity provider to authenticate, and Context7 creates or updates their user record automatically on each sign-in.
The login flow uses the Authorization Code flow with PKCE, so no tokens are ever passed through the browser query string and no client secret is exposed to the frontend.
## Before you start
You will need:
* Admin access to your identity provider so you can register a new application.
* A running Context7 On-Premise instance that you can reach in your browser.
* The Context7 admin password. On a fresh install it is `admin` / `admin` until you change it.
Only one SSO provider can be active at a time. If you already have Microsoft Entra ID configured, enabling OIDC will automatically disable Entra, and vice versa.
## Part 1: Register Context7 in your identity provider
The exact steps depend on your provider, but the end result is the same in every case: you need a **client ID**, a **client secret**, and your provider's **issuer URL**.
### What to configure in your IdP
Create a new application or client in your identity provider and set the following:
* **Application type**: Confidential (server-side) web application.
* **Allowed grant type**: Authorization Code.
* **Redirect URI / Callback URL**: `https:///api/auth/oidc/callback`. The exact URL is shown in the Context7 settings card once you open it, and there is a copy button next to it.
If your provider supports PKCE (most modern ones do), leave it enabled. Context7 always sends a PKCE `code_challenge` regardless of whether the provider requires it.
### Group claims (for role mapping)
Context7 maps a group claim in the token to admin or member roles. Most providers let you include group membership in the ID token or expose it from the UserInfo endpoint. Either location works; Context7 checks both.
In your IdP, configure the application to include the user's groups in the token. The default claim name Context7 looks for is `groups`. Common provider-specific steps:
* **Okta**: add a Groups claim to the authorization server with a filter matching the groups you want to expose.
* **Keycloak**: enable the `groups` scope or add a Group Membership mapper to the client.
* **Auth0**: add a custom claim action that sets `groups` from the user's app metadata or roles.
If your provider uses a different claim name, you can change what Context7 looks for in the **Groups claim** field in the settings card.
## Part 2: Configure Context7
Sign in to your Context7 dashboard with the admin account. Open **Teamspace Settings**, scroll to the **Authentication** section, and click the **Single Sign-On** card. Select the **OIDC** tab.
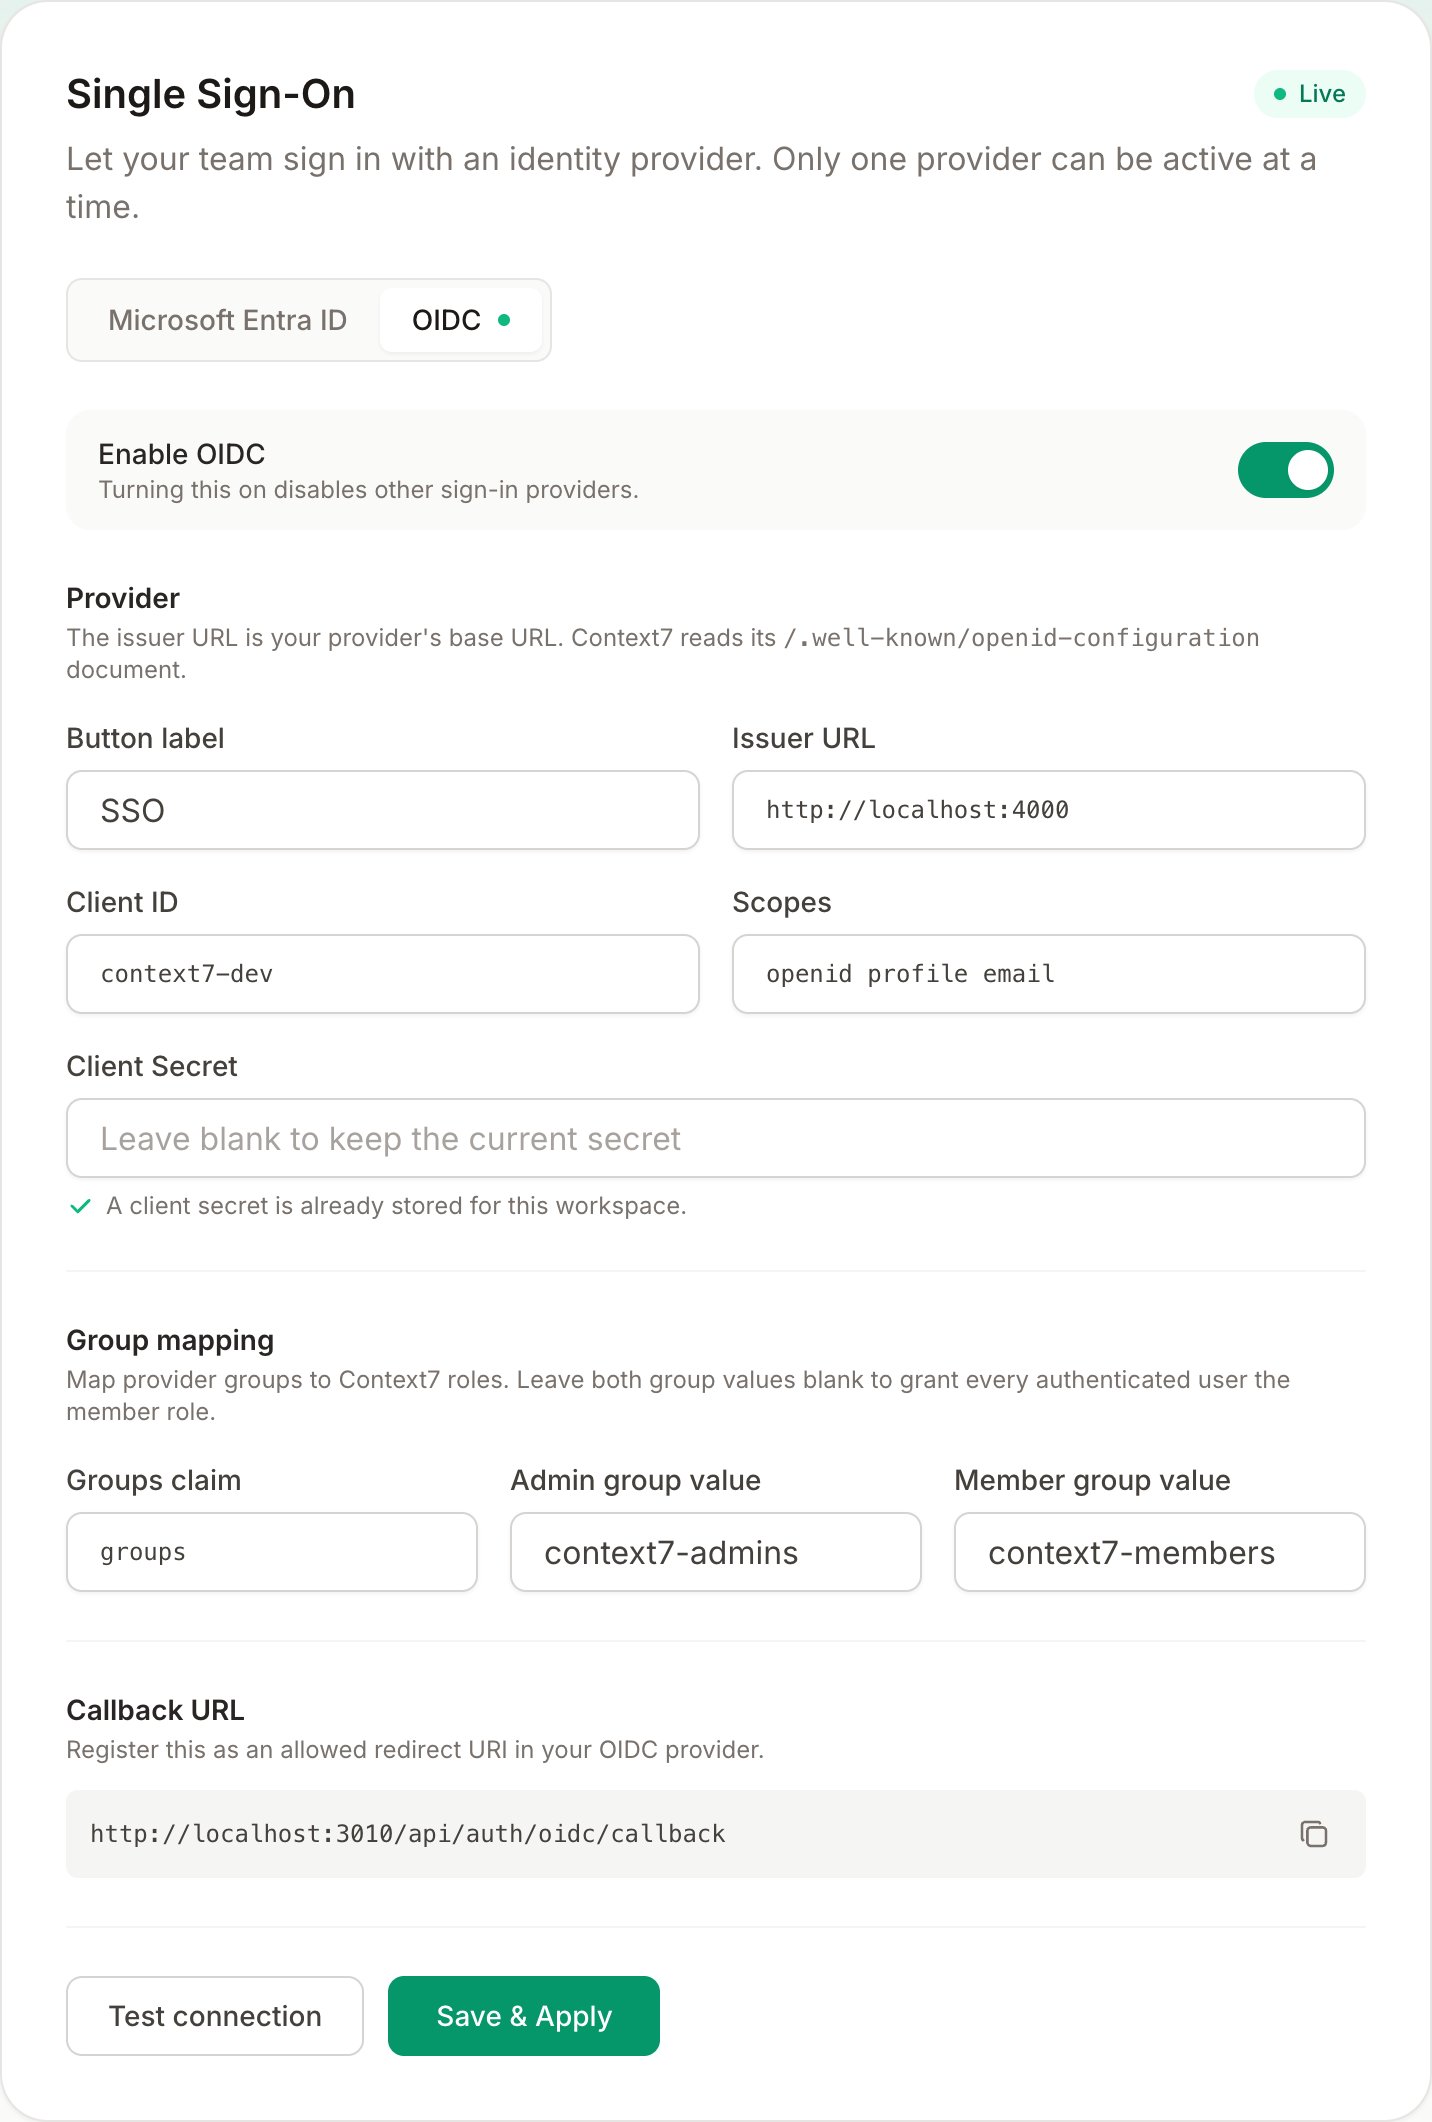 Toggle **Enable OIDC** on, then fill in the fields:
* **Button label**: the text shown on the sign-in button on the login page. Something like your company name or "Sign in with Acme" works well.
* **Issuer URL**: your provider's base URL. Context7 appends `/.well-known/openid-configuration` to discover endpoints automatically. For Okta this looks like `https://your-org.okta.com`, for Keycloak it is `https://keycloak.example.com/realms/your-realm`.
* **Client ID**: the client or application ID from your IdP registration.
* **Client Secret**: the secret generated by your IdP. Context7 stores this encrypted and never returns it to the browser after saving.
* **Scopes**: space-separated scopes to request. The default `openid profile email` works for most setups. Add `groups` or any custom scope your IdP requires to include group membership.
The **Callback URL** at the bottom of the form is what you registered as the redirect URI in your IdP. If you need to update it, copy it with the button and paste it into your IdP's application settings.
The **Group mapping** section controls which users get which role in Context7.
Toggle **Enable OIDC** on, then fill in the fields:
* **Button label**: the text shown on the sign-in button on the login page. Something like your company name or "Sign in with Acme" works well.
* **Issuer URL**: your provider's base URL. Context7 appends `/.well-known/openid-configuration` to discover endpoints automatically. For Okta this looks like `https://your-org.okta.com`, for Keycloak it is `https://keycloak.example.com/realms/your-realm`.
* **Client ID**: the client or application ID from your IdP registration.
* **Client Secret**: the secret generated by your IdP. Context7 stores this encrypted and never returns it to the browser after saving.
* **Scopes**: space-separated scopes to request. The default `openid profile email` works for most setups. Add `groups` or any custom scope your IdP requires to include group membership.
The **Callback URL** at the bottom of the form is what you registered as the redirect URI in your IdP. If you need to update it, copy it with the button and paste it into your IdP's application settings.
The **Group mapping** section controls which users get which role in Context7.
 * **Groups claim**: the name of the claim in the token that contains the user's groups. Default is `groups`.
* **Admin group value**: the exact group name that maps to the Context7 admin role. Admins can open Teamspace Settings and manage other users.
* **Member group value**: the exact group name that maps to the member role. Members can use the workspace but cannot access settings.
If you leave both group values blank, every authenticated user gets the member role automatically. This is useful when your IdP does not emit a groups claim and you want to allow any user from your organization in.
Click **Test connection** before saving. Context7 fetches your provider's discovery document and confirms the required endpoints are present and reachable. A green banner means everything looks good. A red error usually means the issuer URL is wrong or the provider is not accessible from the Context7 server.
Click **Save & Apply**. The status pill in the card header will change to **Live**.
## Part 3: Sign in
Open `/login` in a new browser window. You will see a **Continue with \[your button label]** button at the top of the sign-in card.
* **Groups claim**: the name of the claim in the token that contains the user's groups. Default is `groups`.
* **Admin group value**: the exact group name that maps to the Context7 admin role. Admins can open Teamspace Settings and manage other users.
* **Member group value**: the exact group name that maps to the member role. Members can use the workspace but cannot access settings.
If you leave both group values blank, every authenticated user gets the member role automatically. This is useful when your IdP does not emit a groups claim and you want to allow any user from your organization in.
Click **Test connection** before saving. Context7 fetches your provider's discovery document and confirms the required endpoints are present and reachable. A green banner means everything looks good. A red error usually means the issuer URL is wrong or the provider is not accessible from the Context7 server.
Click **Save & Apply**. The status pill in the card header will change to **Live**.
## Part 3: Sign in
Open `/login` in a new browser window. You will see a **Continue with \[your button label]** button at the top of the sign-in card.
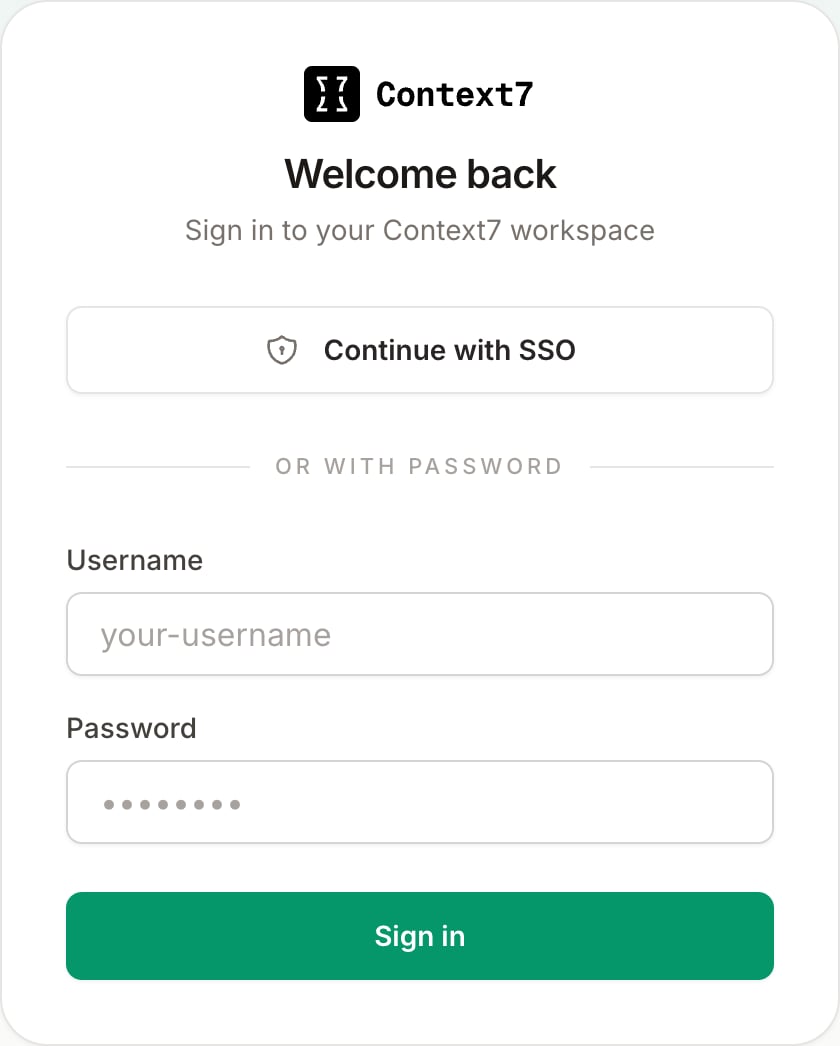 Click it. You are redirected to your identity provider's login page. After authenticating there, your provider sends you back to Context7 with an authorization code. Context7 exchanges the code for tokens, validates the ID token signature and claims, and either creates a new user or updates the existing one.
The first time someone signs in, Context7 creates a user record using their name, email, and role from the token claims. On subsequent sign-ins, the name, email, and role are refreshed from the latest token, so changes in your IdP take effect automatically on the next login.
## Disabling password sign-in
Once OIDC is live, you can turn off password-based sign-in entirely so that all users must authenticate through your IdP.
Open the **Password sign-in** card directly below the SSO card and toggle it off.
Click it. You are redirected to your identity provider's login page. After authenticating there, your provider sends you back to Context7 with an authorization code. Context7 exchanges the code for tokens, validates the ID token signature and claims, and either creates a new user or updates the existing one.
The first time someone signs in, Context7 creates a user record using their name, email, and role from the token claims. On subsequent sign-ins, the name, email, and role are refreshed from the latest token, so changes in your IdP take effect automatically on the next login.
## Disabling password sign-in
Once OIDC is live, you can turn off password-based sign-in entirely so that all users must authenticate through your IdP.
Open the **Password sign-in** card directly below the SSO card and toggle it off.
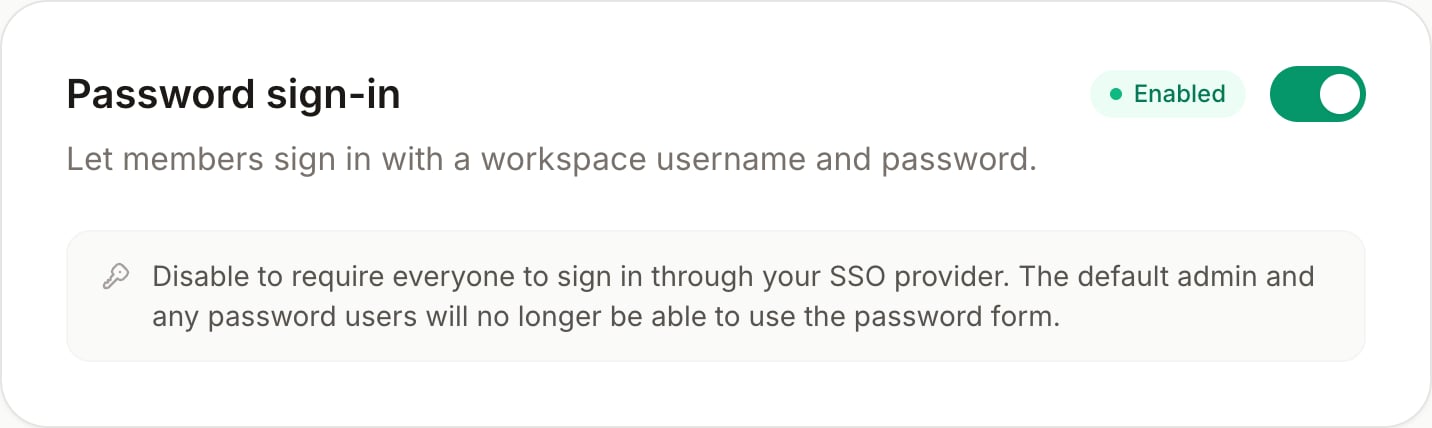 Disabling password sign-in means the default admin account and any manually created password users will no longer be able to sign in via the login form. Make sure at least one admin is mapped through OIDC before turning it off, so you do not lock yourself out. If you turn SSO off later, Context7 will automatically re-enable password sign-in as a safety measure.
## Managing users
All users who have signed in appear in **Teamspace Settings → Users**, along with their authentication provider and last login time.
Disabling password sign-in means the default admin account and any manually created password users will no longer be able to sign in via the login form. Make sure at least one admin is mapped through OIDC before turning it off, so you do not lock yourself out. If you turn SSO off later, Context7 will automatically re-enable password sign-in as a safety measure.
## Managing users
All users who have signed in appear in **Teamspace Settings → Users**, along with their authentication provider and last login time.
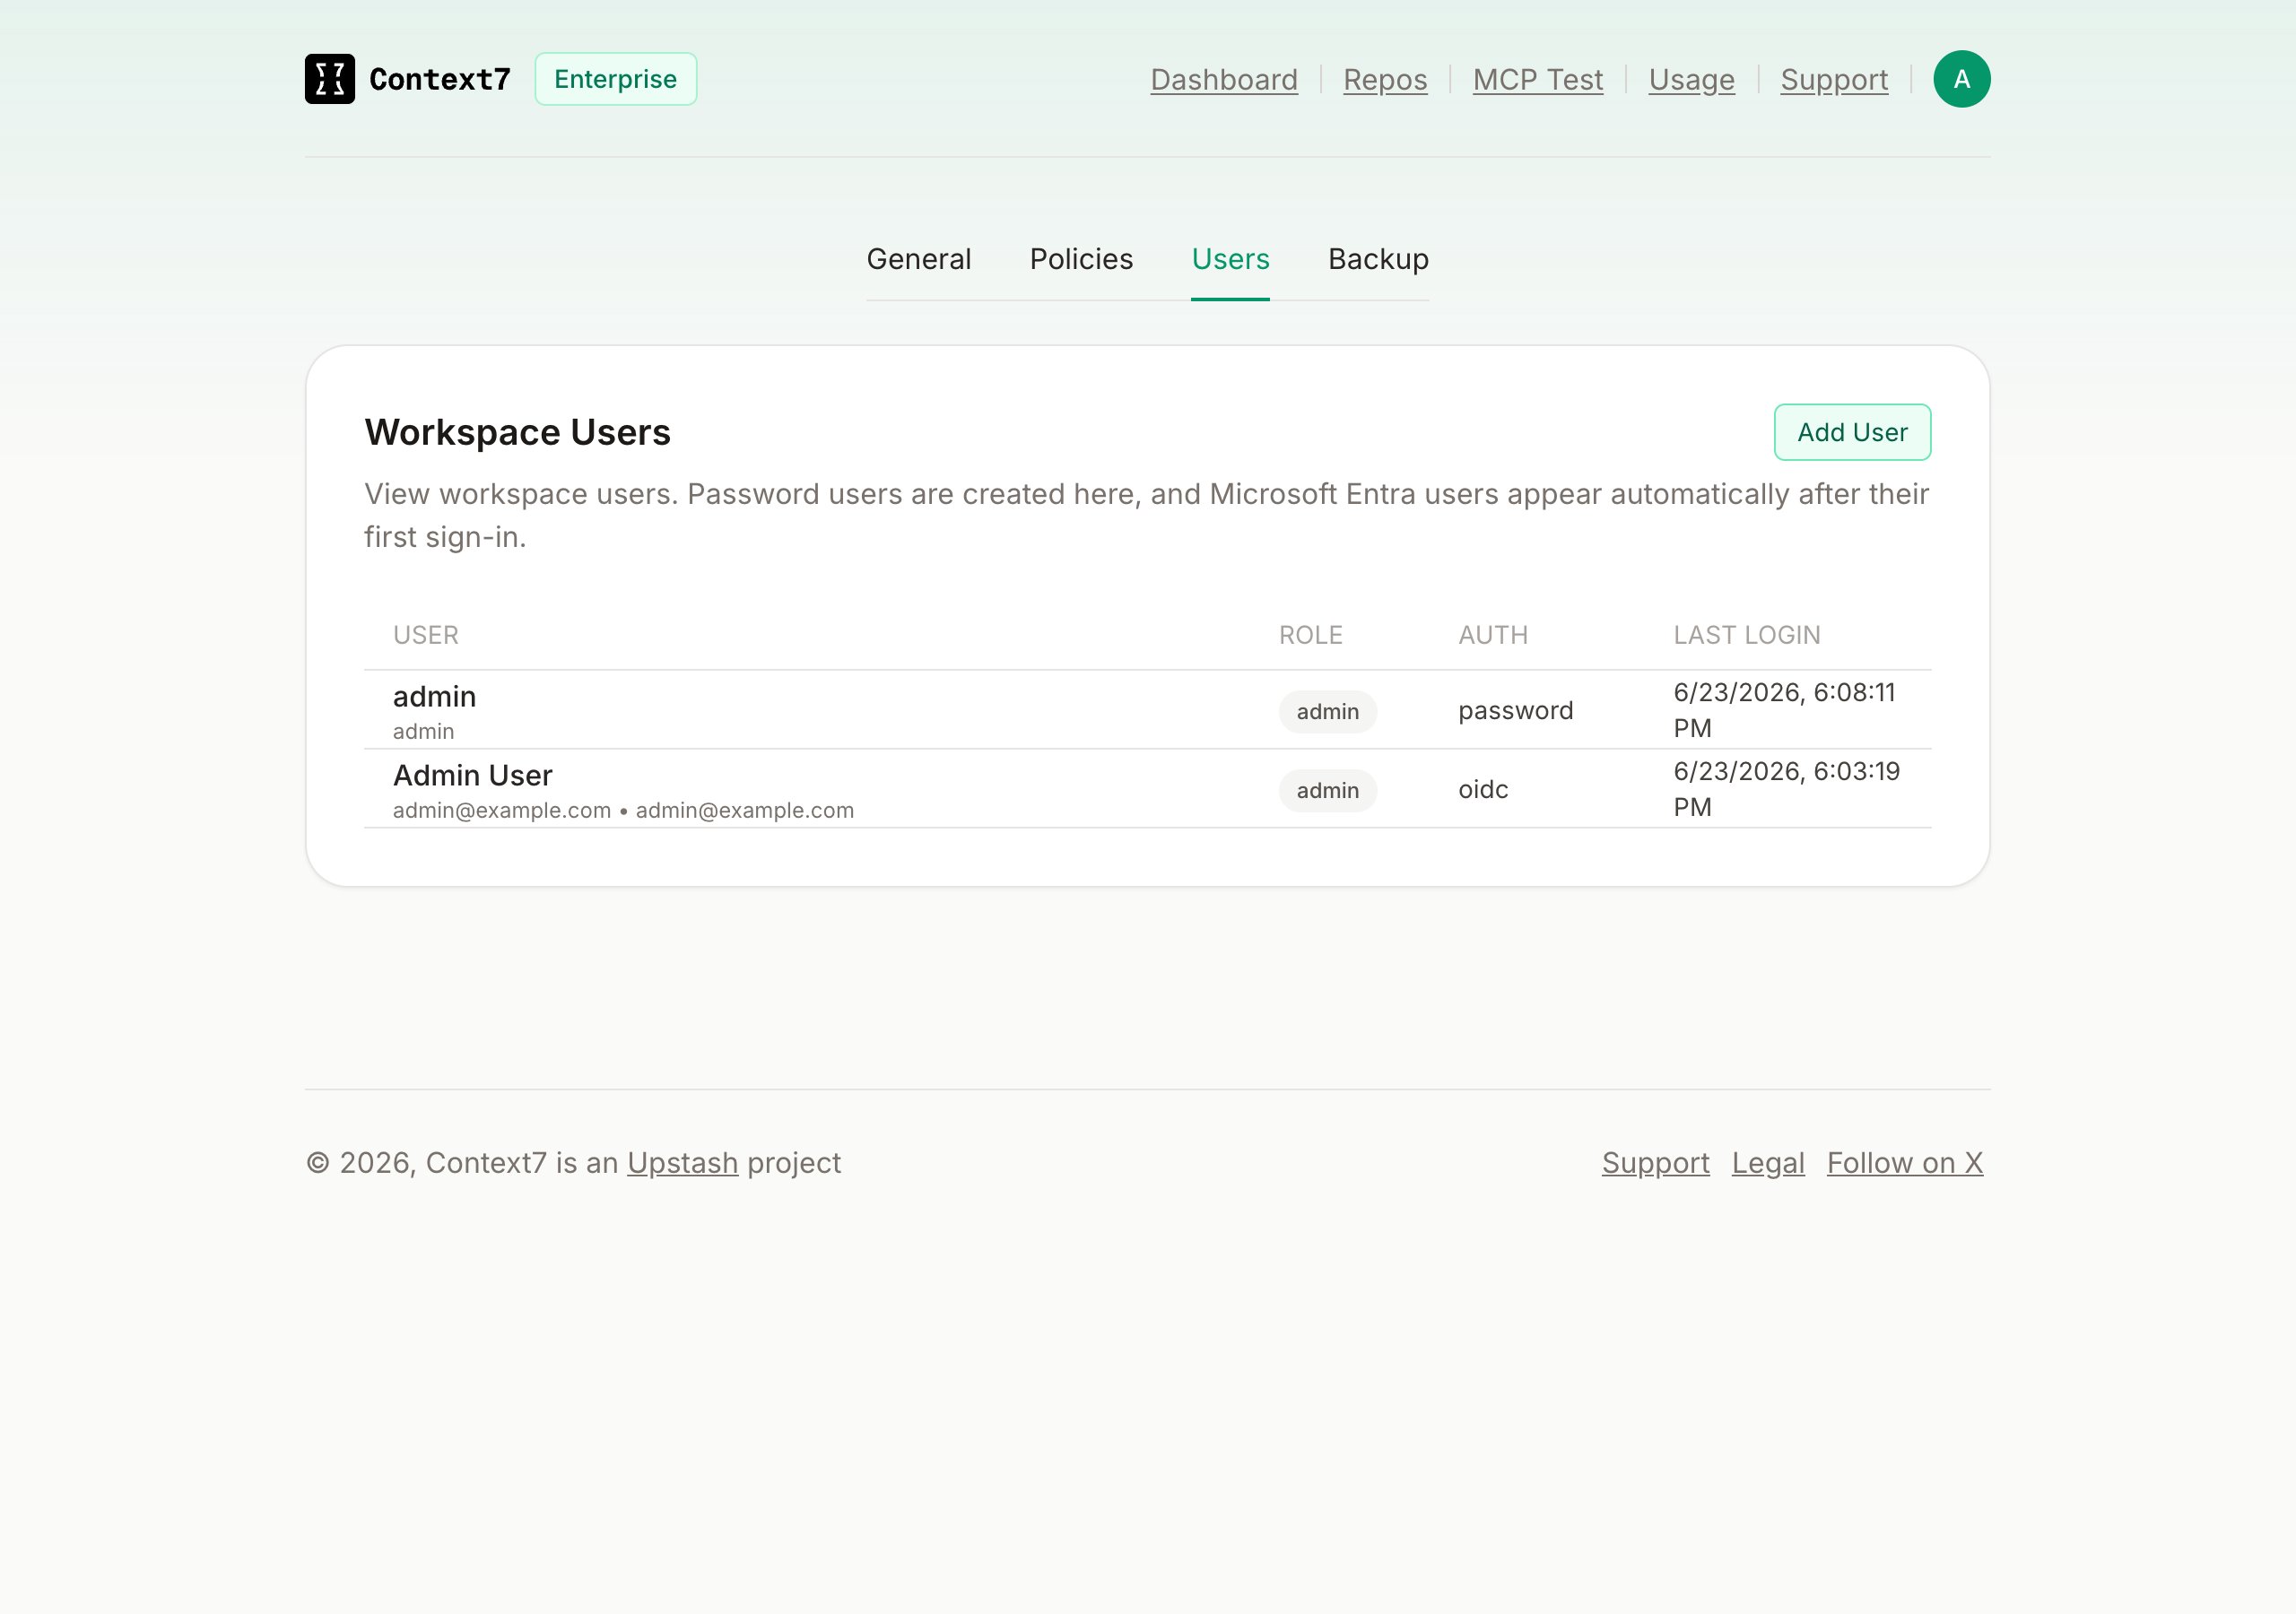 Roles are controlled by group membership in your IdP. To change someone's role, update their group assignment in your identity provider. The change takes effect on their next sign-in.
To revoke access, remove the user from the relevant group in your IdP. Existing browser sessions remain valid until they expire naturally or the user signs out. If you need to cut access immediately, an admin can delete the user row from the Users tab in Teamspace Settings.
## Troubleshooting
### "OIDC SSO is not configured"
The toggle is on but some required fields are missing or the config was not saved. Open the OIDC tab in the SSO card and check that Issuer URL, Client ID, and Client Secret are all filled in, then click **Save & Apply**.
### Test connection fails
The most common reasons are:
* **Wrong issuer URL**: double-check it does not include a trailing slash and points to your realm root. For Keycloak, the format is `https://host/realms/realm-name`, not `https://host/auth/realms/realm-name` (the `/auth` prefix was removed in Keycloak 17).
* **Network access**: the Context7 server must be able to reach your IdP's HTTPS endpoint. If you are running air-gapped or on an internal network, confirm there is no firewall blocking outbound requests to your IdP from the server.
### "This account is not assigned a supported Context7 group"
The user authenticated successfully but their token did not contain either of the configured group values. Check that:
1. The groups claim is included in the token from your IdP (use your IdP's token preview or decode the returned JWT at jwt.io).
2. The **Groups claim** field in Context7 matches the claim name exactly (case-sensitive).
3. The **Admin group value** or **Member group value** matches the group name exactly, including casing and spacing.
### "Single sign-on session expired. Please try again."
The short-lived cookie that tracks the in-progress sign-in was lost between the redirect to the IdP and the return. The most common causes are:
* Starting the flow on one hostname and returning on a different one (for example, `localhost:3000` vs `localhost:5173`).
* A browser or proxy stripping the session cookie.
* Taking longer than 10 minutes to complete the IdP login, which is when the cookie expires.
Having the user retry in a clean browser window usually resolves it.
### Redirect URI mismatch
If your IdP returns a redirect URI error, the callback URL you registered in the IdP does not exactly match what Context7 sends. Copy the **Callback URL** from the Context7 settings card using the copy button and paste it verbatim into your IdP's allowed redirect URIs. Pay attention to `http` vs `https` and the port number.
If Context7 is behind a reverse proxy, make sure the proxy forwards the `Host` and `X-Forwarded-Proto` headers correctly so Context7 can build the right callback URL.
***
For anything not covered here, contact [context7@upstash.com](mailto:context7@upstash.com).
Roles are controlled by group membership in your IdP. To change someone's role, update their group assignment in your identity provider. The change takes effect on their next sign-in.
To revoke access, remove the user from the relevant group in your IdP. Existing browser sessions remain valid until they expire naturally or the user signs out. If you need to cut access immediately, an admin can delete the user row from the Users tab in Teamspace Settings.
## Troubleshooting
### "OIDC SSO is not configured"
The toggle is on but some required fields are missing or the config was not saved. Open the OIDC tab in the SSO card and check that Issuer URL, Client ID, and Client Secret are all filled in, then click **Save & Apply**.
### Test connection fails
The most common reasons are:
* **Wrong issuer URL**: double-check it does not include a trailing slash and points to your realm root. For Keycloak, the format is `https://host/realms/realm-name`, not `https://host/auth/realms/realm-name` (the `/auth` prefix was removed in Keycloak 17).
* **Network access**: the Context7 server must be able to reach your IdP's HTTPS endpoint. If you are running air-gapped or on an internal network, confirm there is no firewall blocking outbound requests to your IdP from the server.
### "This account is not assigned a supported Context7 group"
The user authenticated successfully but their token did not contain either of the configured group values. Check that:
1. The groups claim is included in the token from your IdP (use your IdP's token preview or decode the returned JWT at jwt.io).
2. The **Groups claim** field in Context7 matches the claim name exactly (case-sensitive).
3. The **Admin group value** or **Member group value** matches the group name exactly, including casing and spacing.
### "Single sign-on session expired. Please try again."
The short-lived cookie that tracks the in-progress sign-in was lost between the redirect to the IdP and the return. The most common causes are:
* Starting the flow on one hostname and returning on a different one (for example, `localhost:3000` vs `localhost:5173`).
* A browser or proxy stripping the session cookie.
* Taking longer than 10 minutes to complete the IdP login, which is when the cookie expires.
Having the user retry in a clean browser window usually resolves it.
### Redirect URI mismatch
If your IdP returns a redirect URI error, the callback URL you registered in the IdP does not exactly match what Context7 sends. Copy the **Callback URL** from the Context7 settings card using the copy button and paste it verbatim into your IdP's allowed redirect URIs. Pay attention to `http` vs `https` and the port number.
If Context7 is behind a reverse proxy, make sure the proxy forwards the `Host` and `X-Forwarded-Proto` headers correctly so Context7 can build the right callback URL.
***
For anything not covered here, contact [context7@upstash.com](mailto:context7@upstash.com).